Migrating to and from TangibleXP
Tangible offers one free migration per application. If you're creating a new application on TangibleXP, get in touch with our team for support.
Although it is possible to migrate a WordPress site to TangibleXP using simple methods such as a migration plugin, doing this may overwrite the bespoke configuration and optimization plugins that Tangible includes with every new application. For that reason, and to avoid migration glitches that sometimes occur when moving large sites with a migration plugin, we recommend manually migrating the database and files as described below.
Migration Steps
- Create a new TangibleXP site
- Backup the site's database as a .sql file, either via PHPMyAdmin or using the wp db export command
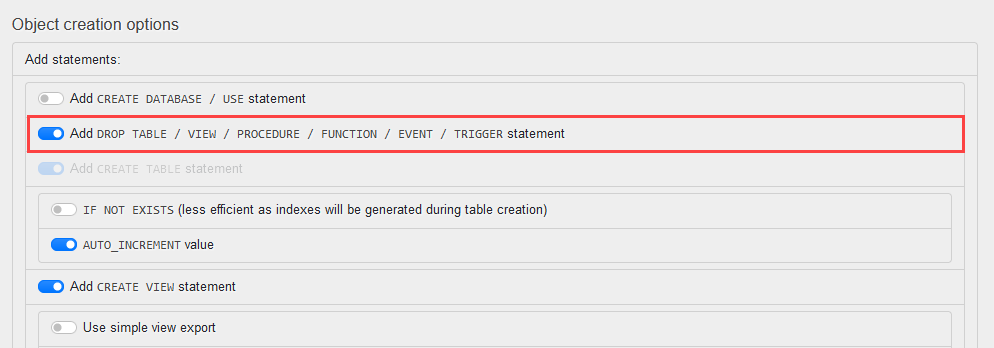
If WP-CLI is not available on the source server, try using the PHPMyAdmin export tool. Be sure to select the main WP database, then select the "Custom" export method. Toggle on the Add DROP TABLE / VIEW / PROCEDURE / FUNCTION / EVENT / TRIGGER statement option, then export.
wp db export database.sql
- Download the site's wp-content folder. Alternatively, use a tool like rsync to move the files directly between the servers.
- Overwrite the wp-content/plugins, wp-content/themes, wp-content/uploads, wp-content/languages directories in the TXP install with the ones from your old site.
- Upload your DB backup file to the new site, then import it via CLI using the wp db import command
wp db import /path/to/database.sql
- Deactivate any caching, SMTP plugins, or migration plugins on the site you're migrating
- Activate Surge and Tangible Object Caching
- Confirm that your data looks correct, then delete up your database .sql backup file
TXP uses the wp_ prefix by default. If you'd like to adjust your database.sql file to use the default prefix, you can run these commands from the directory your .sql file is in:
sed --in-place --expression 's#`old-prefix_#`wp_#g' database.sql
sed --in-place --expression 's#'old-prefix_user_roles#'wp_user_roles#g' database.sql
sed --in-place --expression 's#'old-prefix_capabilities#'wp_capabilities#g' database.sql
sed --in-place --expression 's#'old-prefix_user_level#'wp_user_level#g' database.sql
If you'd rather retain your old DB prefix, update the $table_prefix = 'wp_'; value in the /app/www/wp-config.php file
Using rsync
rsync is a CLI tool for copying files. Here's a simplified strategy that, provided you've a minimum comfort level with SSH and CLI, will get your files moved securely and quickly:
- Generate a key-pair on the destination server using the command
ssh-keygen. When prompted, specify location/app/.ssh/id_rsa - Update file permissions for the private key
chmod 400 /app/.ssh/id_rsa - Get the contents of the public key to and add it to the source server
- Navigate to
wp-contenton the destination servercd ~/www/wp-content - Run rsync. Replace
{port},{username}and{host}with your source server's connection details, and/path/to/wp-content/with the path from your server's root to your WP installation'swp-contentdirectory. Be sure to include the trailing slash.rsync -avz --include 'plugins' --include 'themes' --include 'uploads' --include 'languages' -e 'ssh -p {port} -i /app/.ssh/id_rsa' {username}@{host}:/path/to/wp-content/ /app/www/wp-content/ - Remove keys from the destination server
rm /app/.ssh/{id_rsa,id_rsa.pub}
The database.sql export file can be moved in a similar fashion.
Tips on making rsync faster (note: arcfour is old and you should try the chacha20-poly1305 cipher instead in the ssh -c option)
Remember: don't ever move your personal private keys around or share them. The keys generated during this process should be created and removed as described.
Performing a Search & Replace
Once your database .sql export has been imported on TangibleXP, you can run a search-replace command to update references to domain names if you'd like to test on Tangible's launchpad subdomain ahead of sending traffic to the migrated site. To search and replace the site's domain within your database, run this command on the SQL file before import:
wp search-replace '//olddomain.com' '//newdomain.com' --all-tables --precise
If you want to import your SQL file directly using the mysql command, you will also need to search and replace the database name and database user. This is because your mysql user on TXP (with the username "wordpress") will only have permission to write to the database named "wordpress". Here are the commands you can run on your SQL file before import to accomplish that:
sed -i 's/old_database_name/wordpress/g' database.sql
sed -i 's/old-username/wordpress/g' database.sql
Updating your DNS
Once your files and database are migrated, the final step is pointing your domain to your TangibleXP application. See Connecting Your Domain to TangibleXP for step-by-step instructions.
If you need to map an alias (like a www. subdomain), you can learn more about how to do that in our Redirect tool documentation.